La description n’est pour l’heure disponible qu’en anglais.
AssetGen is a free addon that automates the tasks to get a game assets ready for video games from an High Poly model. While it takes several hours to get an asset ready from an high poly, this addon does that in a matter of few clicks. It is ideal for all your static assets.
Demo: https://youtu.be/-Fy7g3g6uCI
== Download AssetGen addon ==
AssetGen (for Blender 2.79 only): https://github.com/Linko-3D/AssetGen It is developed by Srdan Ignjatovic aka zero025 (kica025@gmail.com) and surpervised by Danyl Bekhoucha aka Linko (dbekhouc@gmaiL.com).
Bonus Unity realistic startup scene: https://github.com/Linko-3D/Realistic-Unity-Project A version with the best looking scene I was able to create in Unity.
== Installation ==
Go to "File > User Preferences…", open the Add-ons tab at the bottom and click on "Install Add-on from File…". Import the whole .zip. In the search bar search for AssetGen and enable it. Don’t forget to click on "Save User Settings".
== Introduction ==
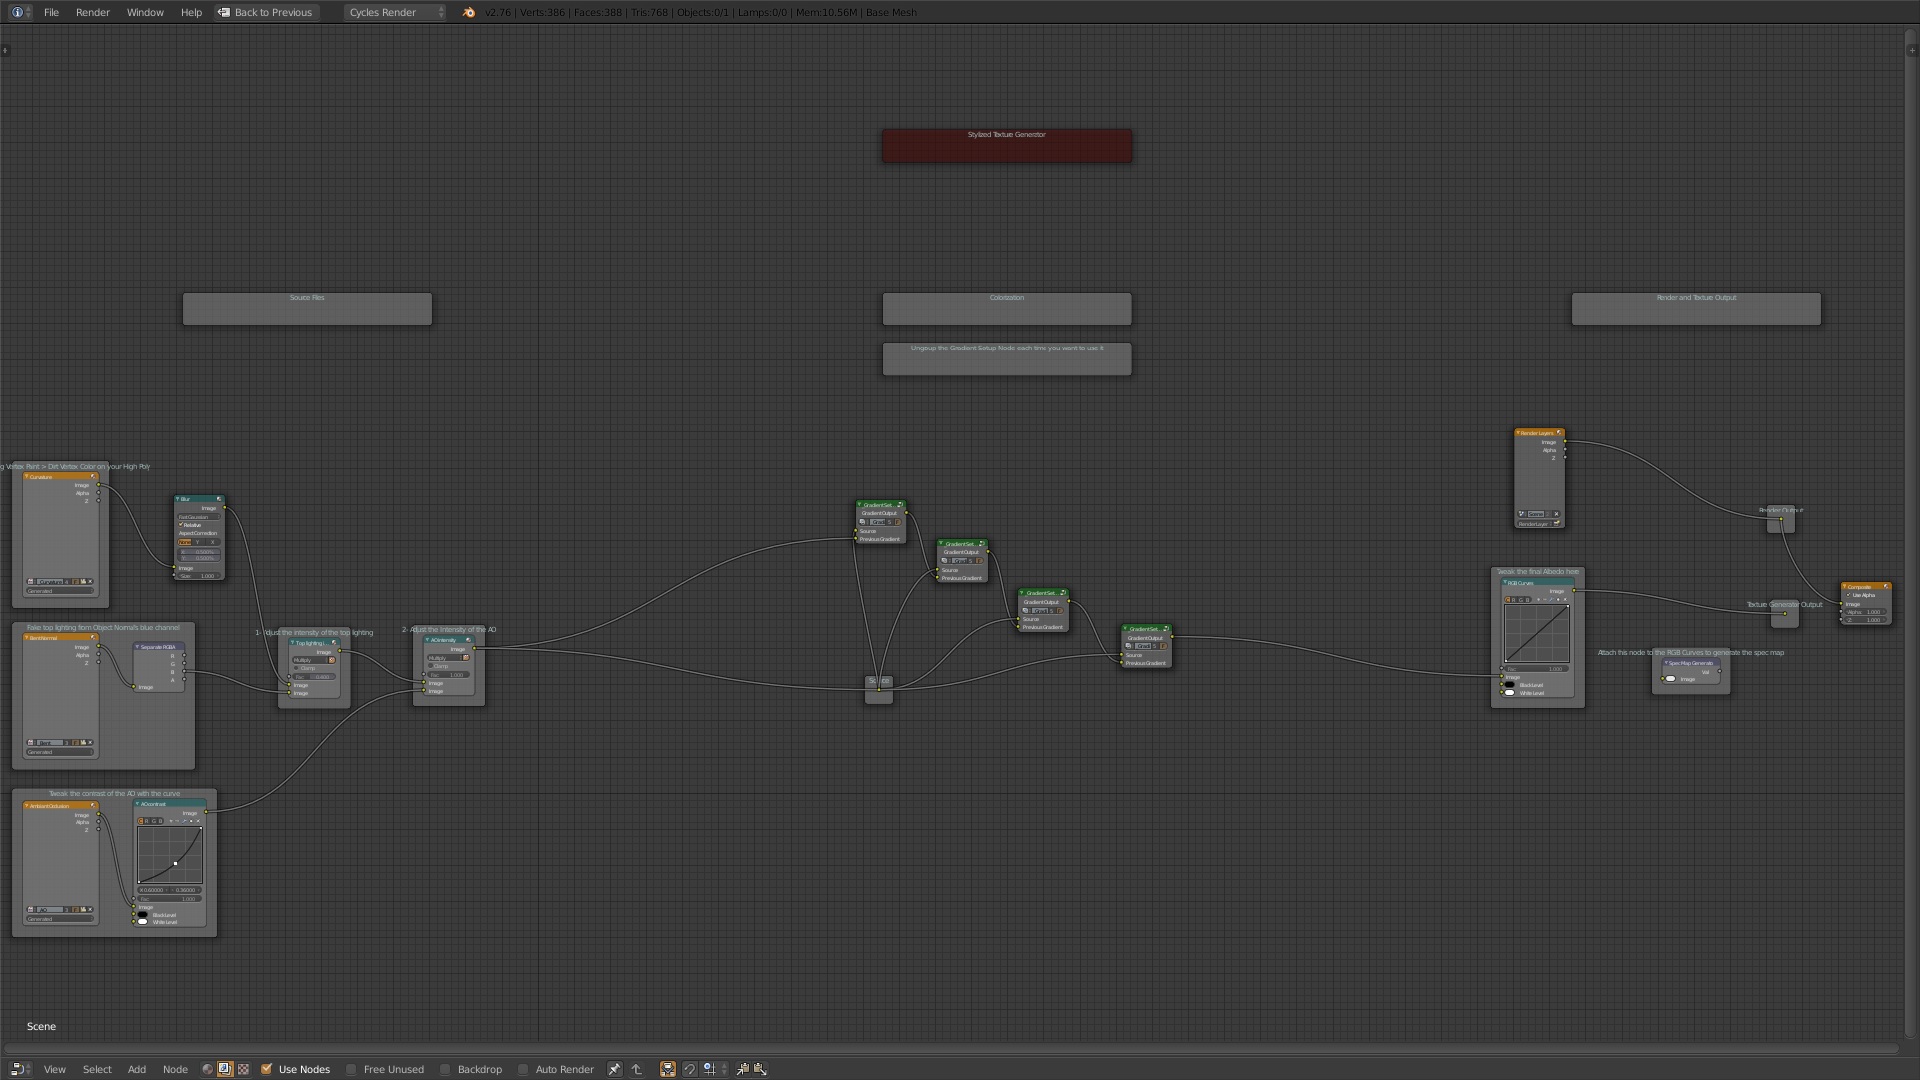
This addon is very useful for generating all your static meshes. For meshes that have to be deformed like characters you should use your own LP. Sometimes the addon doesn’t work very well on models with a lot of tiny parts, in which case you must adjust your high poly by keeping the decimation in mind to use the addon. Even if you use your own low poly you can still use this addon to bake the maps and generate your textures. AssetGen provides tools to help you generate your albedo map, everything will be explained here.
What AssetGen does for you automatically: - you have access to surface details to add micro details on your high poly’s shader, ex. rock effect, wood, etc. The details will be visible on your textures. - the addon generates your low poly including all your LODs at the desired polycount. It will try to remove all intersecting meshes to improve the low poly quality and UV’s texels. - it will unfold your UVs, it can unfold half or your low poly for symmetrical models. You can set the cage, edge padding, etc. The best settings are set by default. - it will bake all your textures, you can choose which texture to bake. The most important ones are enabled by default. You can choose the texture resolution. - it will save your texture to allow to continue your work later. It will use the name you have entered for your asset and will add the _LOD# suffix for each. - it creates a Blender Render shader and nodes for Blender Cycles and creates the lighting to see what the low poly looks like directly after it is generated. - it helps you to create your albedo texture by providing settings to generate a grayscale texture and help you create your gradients. Results are shown directly in the viewport. - you can add texture effects like dust deposition and grunge very easily and adjust the amount and color. - you have access to a tool called "Export asset" which will export your LODs and reset their locations at the path you have specified. It will also export your albedo, normal and AO map in the same folder or in a subfolder (called "Materials" by default to match Unity).
The addon also provides a set of tools allowing you to make a tileable texture, create the silhouette of a weapon and more.
== How to use it ==
Note: Hovering the mouse on a setting displays a dialog box with an explanation.
Game Asset Generator panel:
Requirement: You need a high poly mesh. The script can convert multiple high polys into one low poly, you just have to select all the meshes you want to include in your low poly. Don’t worry your high polys wont be touched, you will keep them separated with their names and modifiers.
Important note: your high polys must be in layer 0 when generating the script. Also the script will delete everything in the layer 1 (this layer is used to display your low poly and to bake the textures).
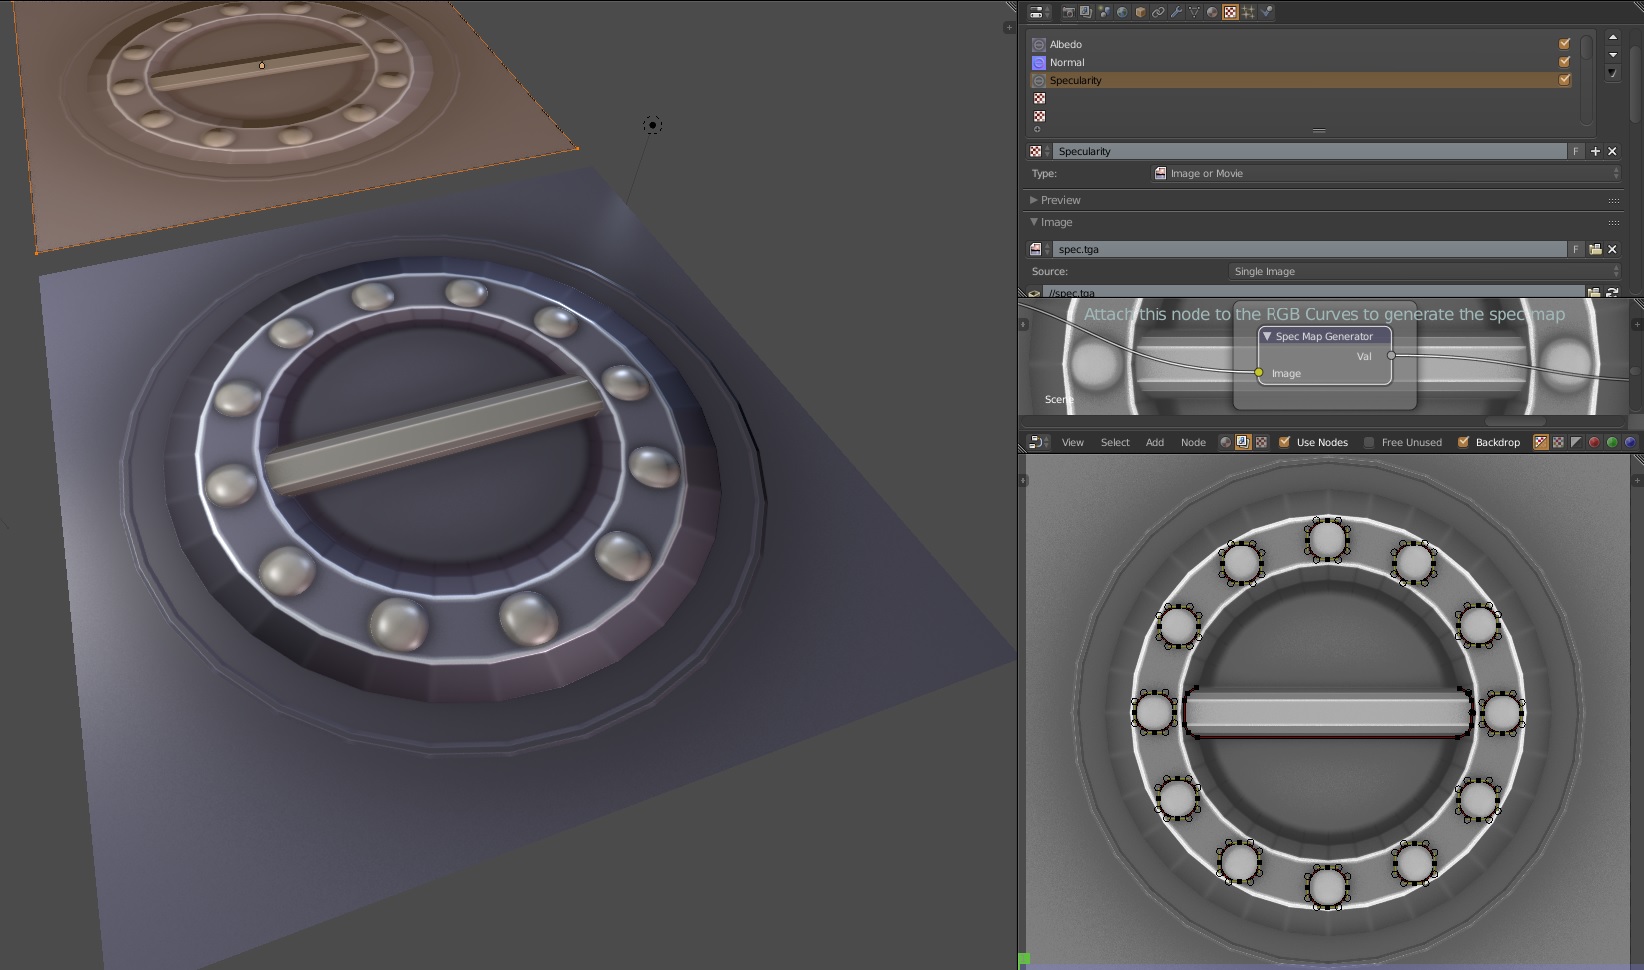
Texture resolution: The first setting is the texture resolution, the settings are indicated in a square (1K = 10241024). To work with it, I suggest to use at least a resolution of 2K (20482048). Modern games use this resolution aswell when display their textures.
Selected to active: Enable this option to use your own low poly. You must select your high poly first and then your low poly (active selection) to use it. If your low poly has no UVs the addon will do use the Smart UVs settings in the advanced settings menu. You can generate a LOD1 and LOD2 from your low poly.
LODs polycount: Those settings are very important, it is the LODs’ polycount in triangles. The LOD0 is the game asset that will be displayed at a close range from the camera. Each new LOD is the model shown further from the camera. You can keep the other LODs at 0 triangles to not generate them. You have to test and see how the asset looks with a low texture resolution, if it’s too deformed and black spots appear (it could also be the cage size too low or intersecting in concave shapes) you can increase the polycount. If a lot of details are captured you could try to reduce the polycount and see how it looks to optimize your game. Generating a game asset takes in average 10 seconds with an 1K texture (ideal for tests) and 1 minute in 2K.
Bellow you have access to the Advanced settings and Texture settings. Their default settings should work with most assets.
Advanced settings: Those options will allow to have more control for baking and textures. By default the settings work on almost all assets. The settings are: - Cage size: this option increase the size of the low poly during the baking to capture every detail. A value too high could generate intersections with concave shapes resulting in black spots. - Edge padding: also known as margin, it is the number of pixels that goes above your UV seams. This allow to not reveal (otherwise lines will appear). - UV margin: it is the space between the UV islands. If the UVs are too close the edge padding wont be able to extend enough, this could reveal the seams. - UV angle: because the addon uses Smart UVs, it allows to define at which angle of the mesh to add a seam. Lower value = more chunks (bad performances), higher value = potential overlapping and lose in texel space. - Samples: this value is only used for the Ambient Occlusion, other maps use 1 sample. More sample will remove the noise but will take longer to bake. - Create envelop: with this option enabled the script will perform an Union boolean between each meshes by loosing parts, in other words most of your intersecting parts of your low poly should be removed. This will allow to get more triangle for the visible parts of your asset and also to not waste UV space. Caution however, this options doesn’t work on models with a lot of tiny meshes and meshes that doesn’t intersect enough to allow the Union boolean to work correctly. - Unfold half: use it if you have a symmetrical asset, this will generate the UVs for half of your texture to double the texel of it. It is particularly good on a mobile game with limited texture resolution. - Ground AO: this option will generate ambient occlusion for the grid, it is useful for static assets that lays on the ground in your game. - Remove undergound: it will remove the parts under the grid before doing the decimation in order to get more details from the visible parts.
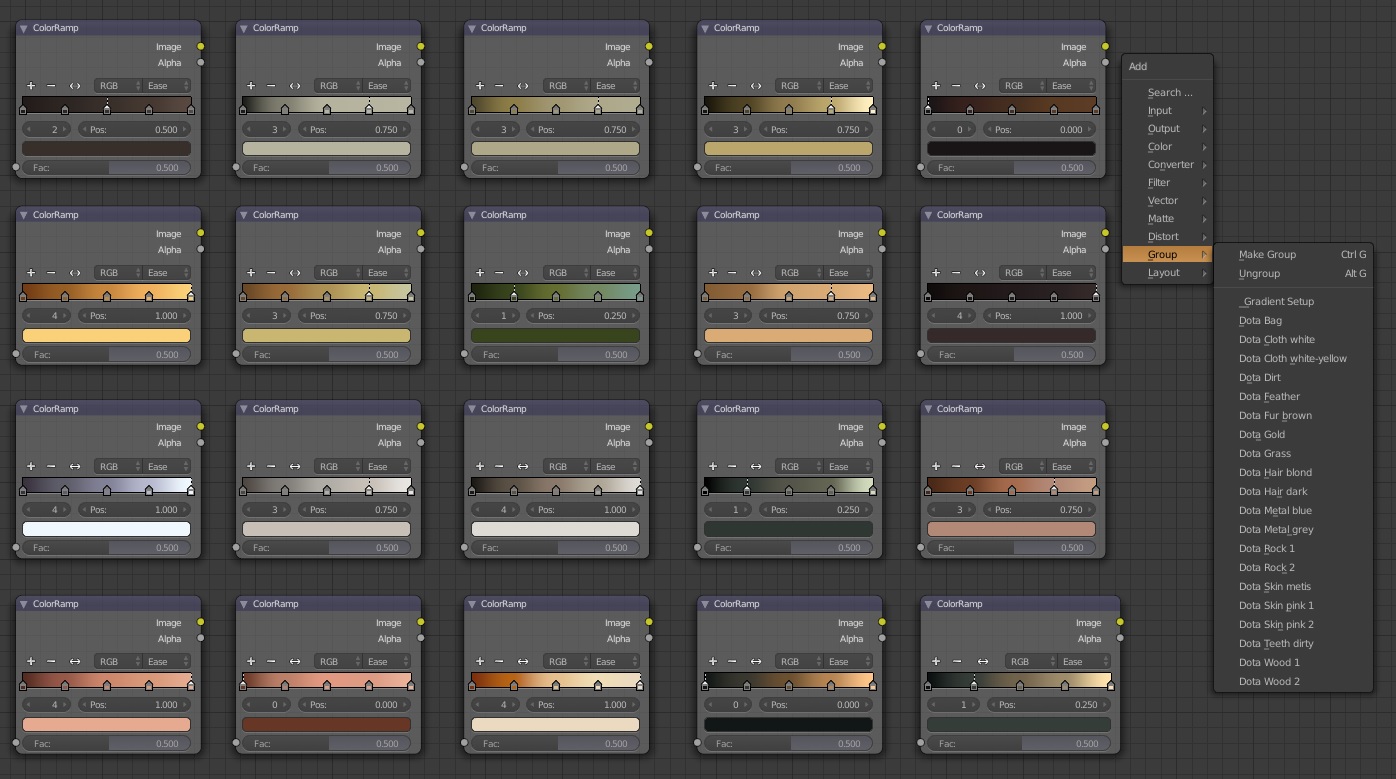
Texture settings: - Mask: this option will allow you to later apply the gradient on areas that have the same color baked. You must define the colors with the diffuse color of your model. Use saturated colors and and hue far from one another to make sure that the masks read correctly (two colors close will be interpreted as the same color mask). - Albedo: enable this option if you already have a texture on your high poly. It is better to generate it on your low poly, but this can be useful if you had a texture from a 3D scanned object. - Normal: the normal is used to capture the details of your high poly. If you don’t want to use it for a mobile game with hand painted texture you should still enable it to generate a curvature map from it. - Ambient Occlusion: generates shadows on parts close to each other so it will work on any lighting condition. In a PBR game the ambient occlusion is added separatly in an Ambient Occlusion slot in order to make the AO on the parts that doesn’t receive lighting in the game scene. - Curvature: the curvature is a map generated from the normal map (so you need to bake it). It will highlight in white the convex parts (peeks) and darken in black the concave parts. The rest will use a middle grey color. It will be used as a base for your albedo texture. This effect gives a slight hand painted look to your texture. You have two options: width for the width of the lines and blur to remove aliasing. - Pointiness: it is a vertex based curvature map that is generated from the geometry. The details of this map will depend on the amount of vetices on your high poly. - Bent: this map will look at your faces orientation compared to the world’s scene, this will allow to use effects like dust and snow deposition on your mesh for your albedo. - Gradient: this map is used on stylized games and especially on MOBA with characters seen from above. It will generate a ramp with dark values at the bottom and bright at the bottom. - Opacity: most game engines can use the alpha of your albedo but if it’s not supported you can use this map. It will show in white the visible parts and in black the fully transparent parts of your asset.
Surface details: You can apply and combine several effects, those effects are procedural textures used as a displacement shader so they are light in ressources and doesn’t depend on the ammount of vertices, they do not change the geometry that is why they are used for micro details. The effects will be visible on the normal map, ambient occlusion map, curvature map and bent map. The pointiness map wont be able to use it the details. When enabling an effect the current material selected will be replaced, it means that you will loose your node setup. You should apply an effect first then change the diffuse color for the Mask map.


 Dit comme ça ça parait impossible, pourtant un script va faire pas mal de manipulations sur votre high poly pour en faire un modèle prêt à être exporté dans un jeu vidéo !